keskiviikko 14. maaliskuuta 2018

Making of Tuulian Minecraft


The idea for this very short demo came from trying to fit my  old JS1k demo "3D City Tour" floorcasting engine into 140 bytes. While working on it I thought it would be cool to try and mimic Minecraft landscapes. Our family's youngest daughter Tuulia is a big fan of the game which not only gave me inspiration for the challenge but also meant that I had a boss who wouldn't settle for anything less than the original. Eventually I told her she would have to live without the lambs.

1. Floorcasting engine


How do you do a Minecraft landscape in 140 bytes of JavaScript on Dwitter?
Well, you first do it in 100 bytes and then just have fun with all the remaining space. :)


Here is the source code for the 100 byte version which I'll use to explain how the landscape generation and rendering work...

for(c.width=i=W=99;i--;)for(j=W;j--;)x.fillRect(i,j,2/(d=700/j),~(d*S(A=i/W+S(t))&d*C(A)+t*9&5)*W/d)

It really is that short. We are using a nested loop. First loop goes through each column of the screen (variable i is basically screen x-coordinate) and the second goes through each row (variable j is screen y).

In the heart of the loop is a call to HTML5 canvas fillRect method. It takes four parameters - x, y, width, height. This is all we need for rendering. The loop goes through each pixel on the screen and we need to decide on two things - the height and the opacity of the rect to draw at that position. The default color is black so we don't need to set it and we can fake greyscale by using rects that are less than 1 in width. You can think of the width as the alpha channel.

I've explained the process of floorcasting in the past so I won't go into detail about it here. In this demo we aren't really doing anything differently, we just do things super efficiently. I'll break it down next.

2. Variables


Variable A is current ray angle. It is calculated by dividing the screen x by total width and adding the camera direction (yaw). Camera direction could be anything but we use the sine of elapsed time for smooth and exciting movement. We could save three bytes here by settling for less pleasing camera path.

A = i / W + S(t)

Variable d is a distant factor. We will need it to figure out where our current ray lands in the world coordinates. We also use it for the fog effect. It is calculated by defining a large number that we divide by the current screen y. 700 was selected because Toni Kukoc wore number 7. For different landscapes another number could work better. We are just doing scaling here.

d = 700 / j;

For our world coordinates we use basic trigonometry. Below are the lines that calculate world X and world Y. We add elapsed time to Y coordinate to achieve movement. It's multiplied by nine cause we like it fast and we have the bytes for it.

X = d * S(A); // world X
Y = d * C(A) + t * 9; // world Y

Since we are in code-golfing mode things can be a little tricky to spot from the source code. The landscape is the result of a very simple height function using the bitwise AND operator. 5 creates a lego city landscape while 7 gives a mountain terrain as used in the color version of the demo.

h = (X & Y & 5) * 300 / d; // world X & world Y & 5

We multiply the output of this formula to get more height and then scale it with d for perspective correction.

That's really all there is to this massive rendering engine.
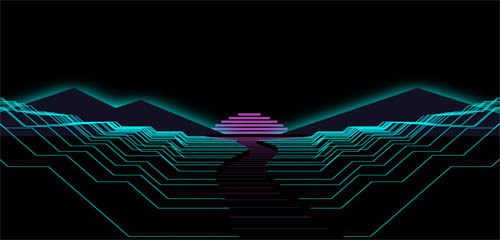
3. Adding colors


For the colored version we need to set RGB channels with fillStyle. Dwitter has a handy R(r,g,b,a) function for this purpose. For the red channel we use the height function value which is h. This makes the high areas more yellowish. For the green channel we use the screen y which in the code is variable j. This channel dominates the scene. It makes distant areas darker adding a nice feel of depth. We use the bitwise OR operator to add fake texture that costs us 2 bytes. Last but not least is the blue channel. This brings the scene alive and is perhaps the most clever part of the demo. First we check if height (h) is false (0). If it is not then zero is returned as value and things stay green. If h is indeed false we need to make the pixel blue. W is set to 300 earlier and we subtract the screen y from it. This means that the pixels higher up the screen will appear more blue than the ones near the bottom. It makes the visuals more interesting than using screen y by itself but also costs two more bytes.

Red  = h, Green = j | 2, Blue = !h && W - j;

The rest of the bytes go into optimization and refining the camera path. The colored version doesn't use opacity so the drawing has to be done with painter's algorithm. It's trivial to just loop screen Y from top to bottom but takes more bytes than the other way around.

4. Conclusion


While it looks like a lot for 140 bytes it really is quite simple demo. And simplicity of course is the key to creating things with limited bytes. Some of my other Dwitter demos have more complex code in them. I'll keep posting more and writing about them. Here are all the demos I've released so far: www.dwitter.net/u/jylikangas

Special thanks to Mathieu 'p01' Henri for saving me 3 bytes with the 100 byte version!


perjantai 9. maaliskuuta 2018

Making of Cyber Auroras


Update - I'm happy to annouce the demo got 3rd place in the JS1k 2018 competition!

1. Changing the process


For JS1k 2018 I took a new approach to creating a small demo. In the past I had come up with some fancy rendering techniques and built the demos on top of those ideas over several iterations. When looking back at them I always had some regrets and felt that some of the early versions might have been better than the final release. Also I didn't feel like the programming was much fun after the initial PoC versions were done. Since I'm always seeking to improve it was time to change this process. Thanks to my partner's suggestion I started using Pinterest to search and collect inspiration. Through this fun period of just browsing through images and videos I got several ideas and I started to think how they could be implemented with limited bytes. I created a Padlet page to write small notes and store all kinds of related stuff. The demo started to become alive even though not a single line of code existed. I narrowed the ideas down to two which eventually were combined into one.

2. Julia fractal auroras


I wanted to try rendering a Julia fractal since I've never done anything with them before. I quickly programmed a small demo that would floorcast the fractal and then move it around to paint a landscape. Mirroring the shadow of the fractal to the top of the image reminded me a lot of northern lights aka auroras. As a nature photographer this concept really hit me.


3. 80s wireframes


I always get inspired by retro style art with simple wireframes and went through a ton of them on Pinterest. I then came up with a scanline rendering technique which could do those landscapes in small size. I wrote down the logic and then did a test implementation of a Taiga forest. Again working from sources of inspiration towards my personal interests.


4. Implementation


Since I had done a lot of background work I was really anxious and motivated to start programming the demo. I had a clear vision of the end product and had achieved a personal connection to it on many levels. I was so excited I basically did the whole thing over one weekend. I code-golfed the PoC implementations as small as I could so I would have room to add a storyline and add some bonus effects. As usual the biggest improvements came from simplifying the visuals rather than working on the code itself:

  • I dropped the vertical lines from the wireframe engine and made the height function really simple
  • I limited the number of total colors
  • I rendered the fractal with really large pixels and only two colors. This not only saved space but made the demo run nicely on mobile phones
  • I reused my old implementation of a starfield for a cheap night sky

Now I had a solid demo and a lot of bytes still left. It was time to go back to Pinterest to look for those little things that make a huge difference...


5. Adding the storyline


I think the reason that my Highway at Night demo became somewhat popular was because it not only created a small world but also had a story. Events followed each other and got crazier towards the end just when you thought you'd seen it all. I wanted to do the same thing this time and because of the auroras theme it was obvious how it all should go...
  • Start with a nice landscape view with the camera following the path of a river
  • Sun sets changing the water color and revealing the stars in the sky
  • Scene opens up for the upcoming light show when we arrive at a lake
  • Auroras fade in and approach the viewer
  • Water starts reflecting the sky adding more interest to the scene
At this point I had pretty much ran out of space but I needed a grand finale. I got the idea for a meteor shower from a GIF on the internet showing objects hitting water. It was time to do some more code-golfing because it was clear I wouldn't be happy without getting it all in. Luckily my scanline rendering engine allowed to do the splashes with small cost and the meteors could be drawn as a simple chain of growing rectangles.


After some more heavy size optimizations I could actually get lazy and just do the background mountains with regular canvas lineTo-function and add shadowBlur to them. I know I could have done it differently to save space for even more things but I felt the demo was ready. I released it two weeks before the deadline. I was and still am very happy with it. I was left with many more ideas in my head but luckily found my way to Dwitter. I spent the next two weeks releasing several 140 bytes demos there and you can check them all out HERE. I'll be writing about them later.

6. Conclusions and source code


Inspiration and personal connection to the subjects will drive you to better performance and leave you a much happier programmer! Thanks for reading and see you on Twitter & Dwitter. :)


X=0;
S=50;
w=S*6;
setInterval(()=>{
X||(Z=T=0); // intialize counters
X=X>999?Z=0:X+.2; // loop back to start
a.height=a.width=W=w*2;
c.fillRect(0,0,W,W);
c.fillStyle="#A4A";
c.globalAlpha=(Z++-W)/W;
for(x=W;x&&Z>W;x-=6)// Julia
for(y=W;y>w;y-=6){
i=W*S/(y-w);
k=(X+i*Math.cos((x-w)/W)-S)/W;
l=i*Math.sin((x-w)/W)/W;
for(i=0;k*k+l*l<4&&i<40;i++)z=k*k-l*l+Math.cos(Z/w)/20-.8,l=2*k*l+.2,k=z;
if(i>25){
c.fillStyle=i>38?"#A4A":"#0C4";
c.fillRect(x,W-y,3,5);
X>420&&c.fillRect(x,y,3,1)// reflection
}
}
c.globalAlpha=1;

s=Z<w?0:s+.3; // sunset
for(x=7;x--&&s<S;)c.fillRect(250+x*x,337+s-x*9,99-x*x*2,6);
c.fillStyle="#0AC"; // stars
for(x=w;x&&s>S;x-=6)c.fillRect(x*x%W,x,1,1);
c.fillStyle="#112"; // mountains
c.strokeStyle=c.shadowColor="#0FF";c.shadowBlur=S;
c.lineTo(-99,350);c.lineTo(90,220);c.lineTo(140,270);c.lineTo(170,250);c.lineTo(w,360);c.lineTo(500,220);c.lineTo(700,350);c.fill();
c.fillStyle="#000"; // mask
c.fillRect(c.shadowBlur=0,340,W,S);

p=Z/S|0;
for(y=p*S;y<W*4+p*S;y+=S){ // scanlines
c.beginPath();
for(x=W*4;x-=S;){
z=w/(y-Z+w); // scaling
k=Math.abs(W*2-x)/(W+y)*9-1|0; // terrain height
i=w+(x-W*2)*z;j=w-(k*90-w)*z; // project to screen coordinates
y<w*7&&y%80<S&&x!=W*2&&c.lineTo(i,j);
k=y>1900?y-1900:0; // river flows into a lake
if(x==W*2){
c.fillStyle="#000";
y<W*4&&c.fillRect(i+Math.cos(y)*S*z-(S+k)*z,w+w*z,(150+k*2)*z,S*z);
c.fillStyle=s>S?"#0AC":"#A4A";
c.fillRect(i+Math.cos(y)*S*z-(S+k)*z,w+w*z+70*z,(150+k*2)*z,.5)
}
T>S&&( // meteor hit
k=(Q-120)*-4+x,
l=y-p*S-W,
j=Math.sqrt(k*k+l*l),
T>S&&j<T*4&&j>T*4-70&&c.fillRect(i,w+w*z,4,2) 
)
}
c.stroke()
}
// meteor shower
if(T){
for(x=20;x--&&T<S;)c.fillRect(Q-T*2-x,T*7+x*3,x/4,x/2);
T=T>120?0:T+.9
}
!T&&Z>W*6&&(Q=w+Z%w,T=1)
},9)