1. Copying and creativity
I refined my new tunnel engine and got so inspired by it that suddenly I was filled with ideas. I wanted to let my creativity out instead of carbon copying the video. I collected more inspiration by searching light tunnel videos and hallway architecture images. Below are some notes I had written down.
- Create shapeshifter plugins that alter the tunnel shape
- Create switcher plugins that turn individual lights on / off
- The further you go, the more you experience
- Let's create something special!
Going from copying to creating is something that happens often with arts. Don't wait for inspiration - start to work and you will find it!
2 . Tunnel engine
The tunnel engine is best described by a set of requirements and illustrations...
- Tunnel is a loop of indexed layers
- Viewer position in the tunnel is t
- Visible segment is 24 layers forward from t
- Layers are closed 2D polygons that have 24 sides
- Polygons are drawn front to back
- Each polygon forms a clipping area that clips the drawing of the next layer
- Polygons are filled with transparent color
- Polygon sides are sometimes drawn to form a gate
- Polygons are scaled based on distance from viewer
- Polygon points are lights that are either on or off
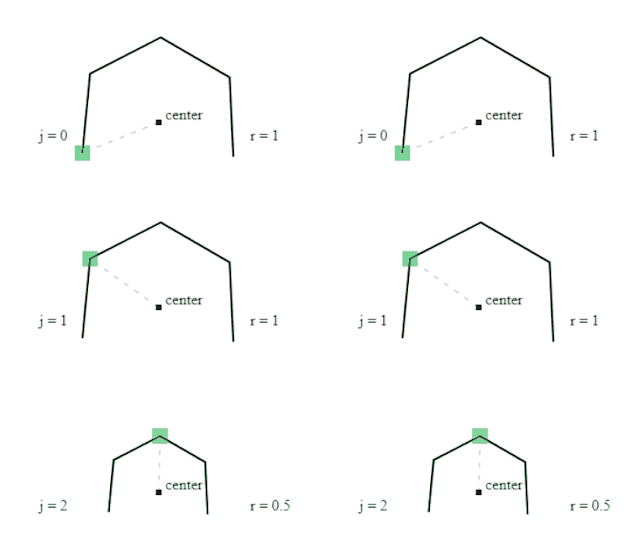
- Polygon has a center that is the local space origin for its points
- Polygon points are vectors created with rotation formula
- Vectors can have varying length
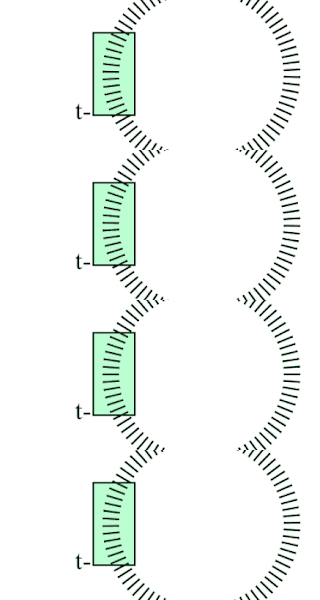
The importance of clipping is easy to understand from the comparison below. On the left the polygon outlines are drawn for each layer in full. Clipping makes the tunnel more realistic and clean looking.
3. Shapeshifters
Shapeshifter plugins manipulate vector length based on position of layer and current point index j. They return a multiplier to use in rotation formula calculation. Below you can see how the shapeshifter formulas alter the tunnel shape. First shape is the default where each polygon point vector has a length of 1. It can be mixed with the square shape to form a cool corridor. Square can also be tilted to form a spiral tunnel. The third shape I call the circus entrance. Last example is a cave achieved with filter expression Math.sin(j >> 1 & p) / 3 + 1 where j is index of current polygon point and p is layer position. Because p is different for each layer we get variations in the resulting shape.
4. Switchers
Switchers decide if the current polygon point light source is switched on or off. They are expressions that resolve to true or false based on input and are used to animate the lights. At the very beginning of the demo we only activate two lights on opposite sides to create railings. The expression for this is j % 17 == 3. When we only want the top lights on we can use j > 9 & j < 14 which we can shorten to j % 14 > 9.
To get more complicated patterns we'll use more arguments. For example Math.sin(j + p + t) < 0 gives us a hypnotic spiral.
I created a lot of different filters and chose the ones that had the best bang for the buck. These filters were then arranged to form a storyline where things would get more interesting the further we go. I ended up with a really long demo. I got comments that maybe it was a bit too long so I got rid of some of the filters to make room for a surprise ending...
5. Breakout
So there needs to be a treasure behind the crystal cave. 3D diamond was my first thought but it was too obvious. I wanted something that the viewer wouldn't expect but at the same time it would make sense in a programming competition. I had done mini tribute demos of Tetris, Breakout, Defender and Invader and I knew I could do any of them with the remaining bytes. Breakout was the most suitable choice. It has walls just like the tunnel and I could do physics that react with them. Below is a short screen capture from dwitter.net.
6. Conclusion and source code
I really hope JS1k 2019 won't be the last time this awesome competition is arranged. It has inspired and entertained programmers worldwide. It was my introduction to code golfing in 2013 and what a journey it has been. Huge thanks to the organizer Peter van der Zee and all the participants and judges throughout the years!
At the bottom is the commented source code. I hope you enjoyed the demo and this article.
Follow me on Twitter if you want to hear of new demos and blog updates - @jylikangas
At the bottom is the commented source code. I hope you enjoyed the demo and this article.
Follow me on Twitter if you want to hear of new demos and blog updates - @jylikangas


Ei kommentteja:
Lähetä kommentti